")
")
Its patent dates back to 1875 but it did not reach success among the public before the 1890s.
The restoration of a wardrobe trunk is rather similar to the one of a standard travel trunk; however the major differences are the following ones:
- The dimensions (obviously enough, larger dimensions mean more work)
- Small wardrobe trunks (0.80m high and 30cm for each side)
- Classic wardrobe trunks (from 0.80m to around 1m high and 5cm for each side)
- Large wardrobe trunks (over 1.10m high)
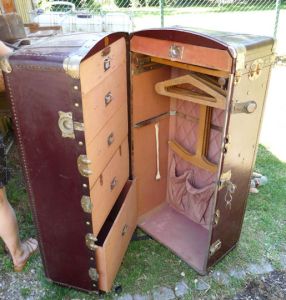
- The care given to the interior layout: unlike the other trunks, some of which are sometimes equipped with one tray only, the wardrobe trunk is always a lot more complex: with drawers and clothes hangers in most cases; sometimes you will find a folding writing desk, a fixing system for hats or for irons, or mere compartments for shoes, shirts…
- The used materials: unlike flat or dome-top trunks which are often made of solid poplar wood, in most cases wardrobe trunks are made from plywood, laminated wood or fiber The whole trunk (like the other trunks this time) is covered with coated canvas, pegamoid, more seldom leather, canvas, sheet metal, etc. and for the most recent ones, with plasticized coating.
Detailed information on restoration techniques is available in our Travel trunk restoration guide = Le guide de restauration des malles de voyages.
EXTERIOR RESTORATION


Example of a large wardrobe trunk for which only the exterior part was restored
The canvas, beyond repair, had to be taken off and it was decided to restore with an oak shade wood stain. That could be done because the coating canvas was glued on a laminated, but solid, wood; plywood would not have withstood restoration.
It was necessary to:
- Take off the canvas, clean the hardware and jewelry
- Sand, apply the wood grain filler treatment, etc.
- Apply wood stain, wax, then polish


Example of a canvas coating pasted on plywood.
The coating has been dyed again (it is not leather) in order to safeguard it and thus to preserve its antique appearance; then it has been waxed with black wax.
The below trunk interior has been washed to be kept.
(Note the fiber binding – not leather one as people often believe).
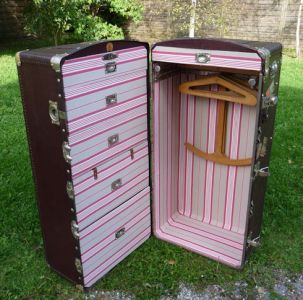
INTERIOR RESTORATION

Here above is the first step of a wardrobe trunk restoration.
Of course you will first take off the canvas from each drawer, then from the sides of the trunk.
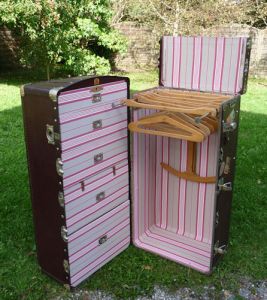
Once this done, you will have to disassemble the whole interior jewelry and the following parts: handles of the trunk and of the drawers, cleats of the drawers, arched door, shelves…
After that, it is essential that you sand the drawers to deduct 2 mm in order to enable the replacement of the drawer fabrics by fabrics most often thicker at that time.
For the coating, do as you would for a trunk (cf. The antique trunk restoration guide).
Reassembly will be done either with clinch nails according to best practices, or, in a more modern way, with rivets.
The objective is to have no flush fixing which would prevent the drawers or layouts from sliding.
For example:

Before and after restoration on a Cosmopolis trunk