")
")
 La malle en coin : eighteen years of experience and passion for trunks restoration !
➡️ Visit our blog and see, for example, how to restore a Goyard trunk…
➡️ Watch our videos on how to restore a simple, common trunk.
➡️ Find our best tips on our Youtube channel.
➡️ If you wish to read a guide on how to restore trunks, you can find our book (in french) "Restauration des malles de voyage" with lots of pictures and advice.
⚠️CAREFUL : if the original canvas or leather can be re-used, preferably keep it!!!
The hereafter explanations only apply to low-value trunks, whose canvas is entirely destroyed, or which are in complete disrepair, preventing from re-using their canvas, or even which have an ordinary canvas that you find is not worth re-using. These explanations do not apply to Vuitton, Goyard, Moynat, Hermès trunks or to 100% leather trunks.
If you wish to keep the canvas or leather of your trunk for reuse, send us photos of your item and we will give you personalized advice by email This email address is being protected from spambots. You need JavaScript enabled to view it. or you can use the expertise and information form.
Preamble
The interior and exterior restoration of a 90 x 50 x 50 cm trunk will take about 14 working hours (for a normal DIYer, or more or less beginner). Apart from the machines (sander, drill for instance), you will have to invest around 100 euros in sandpaper, brushes, wood stain, wood grain filler, wax and interior canvas. A restoration work spreads over several days, so as to leave the stain or wax penetrate properly. Never sand a wet piece of wood.

STEP 1 : Removing dilapidated canvas
To be done only if your trunk has a torn canvas and is of little value. If there is a doubt, send us photos for estimation. Do not take off the canvas of a luxury trunk (Goyard, Vuitton, Moynat Hermès). Do not try either to take off the canvas of a Cosmopolis-branded trunk (cardboard blank) or a Lavolaille one (metal bar under the canvas).
Use a box cutter, be careful to duly tilt it under the slats. Your free hand must always be placed BEFORE the hand that holds the box cutter. In case of skidding, your fingers will be thankful.
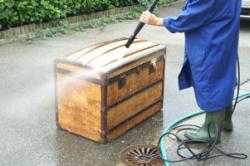
STEP 2 : Cleaning.
Most of the time, the collected trunks are dirty, smelly and dusty. A thorough clean-up, preferably on a sunny day, is essential.
If you do not have access to a high-pressure cleaner, no worries : a brush, a basin full of hot water and why not soap will enable to soften and to clean the glues and grime that accumulate over the years. Remember that your trunk is 100 years old!
IMPORTANT : Be careful to let your trunk to dry in the shade, in a ventilated area.
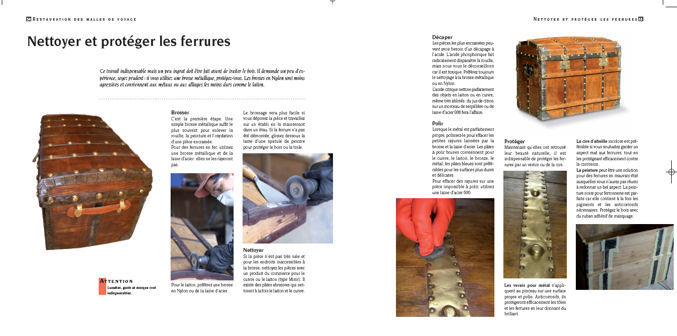
STEP 3 : Brushing the hardware.


 Example of a before/after metal ornament, detailed in our Restoration guide.
Example of disassembling : in the following example, the brass ornaments are very dirty. You will have to undertake polishing in order to restore and repair ornaments and locks.
- When reassembling, you must take great care not to damage them.
- Keep all the nails and untwist them in order to reuse them when reassembling.
- Don't hesitate to visit our shop for parts.

STEP 4 : Wood filling and repair, if necessary
Preferably use Syntobois rather than a too crumbly wood pulp.
Do not hesitate to create formworks if necessary.

STEP 5 : Sanding the trunk
Details can be found in our Restoration guide. Usually we sand in 3 steps with a progressively finer grain, from grit 50 to grit 120 or 180, using the grit 80 in between. Always sand AFTER cleaning the hardware, in order to to be able to correct possible skidding.
STEP 6 : Sanding with fine grit.
Use finer and finer sandpaper, to end with around grit 120 (in case of a varnish – but we advise against varnish -, you will have to use even finer sandpaper, grit 240 or even 320).
STEP 7 - Treating the leather.
Not illustrated here. Neatsfoot oil is used preferably, but, if not, you can use Mixa baby milk which usually treats more delicate “leather” !
STEP 8 - Placing adhesive tape for hardware painting, if necessary.

If the metal ornaments are naturally beautiful, be careful not to paint them. Prefer the use of a brush, and then wax to protect them. But if necessary, you can paint or simply dye in black, which is even better.
STEP 9 - Putting on cut sheet metal, in place of the old damaged ones.
Full details in the Restoration guide.
STEP 10 : Painting.
That is a matter of opinion ! But sincerely, I almost never use paint. We avoid painting trunks as much as possible.
STEP 11 : Staining the trunk
STEP 12 : Using the wood grain filler.
The wood grain filler makes wood impermeable to the following products such as varnish or wax that you might want to apply next. Once applied, the wood grain filler must be lightly sanded to smooth it. Thus you push back the wood fibers which have straightened with humidity.

STEP 13 : Varnish or wax.
All types of varnishes are possible, but you can also wax and polish your trunk. More information in the Restoration guide.
STEP 14 : Fine sanding.
If you want a high-quality varnish, this step is necessary and can even be done twice. That method is used on trunks with large wooden areas and few metal ornaments.
STEP 15 : Top coat varnish
 STEP 16 : Internal coating.
Detailed in the Restoration guide. The process consists in gluing the fabric on a very thin cardboard called “cartonnette” (in French) and used in framing works. And then, folding the edges on the back of that mounting board. You will do this folding in some places but not in others, in order to coat the corners without anybody seeing the wood. You should create a pattern for the bentwood banded, rounded or curved areas. You can as well create padded upholstery, redo an interior layout, re-create the interior trays for clothes, etc.
That step required in the book some plans that I cannot publish here, several dozens of photos and rather long explanations. During the training that we provide here in Haguenau, the coating of a trunk is a training that lasts a full nonstop working day. Therefore, be patient and ready to spend a little time on it.
What you need and how much will cost a complete restoration
Excluding the purchasing price of the trunk, costs will be around 80 to 100 euros.
➡️ Some examples below :
- Washing powder to wash and take off the canvas (washing powder with soda like St Marc)
- Cutter – Brushing the metal ornaments (1 wire brush, 4 euros, and 1 nylon brush, 7 euros)
- Sanding (sandpaper grit 50-80-120) 7 euros
- Wood pulp – Wood stain 15 euros per liter – Paintbrush 1 euro
- Wood grain filler 8 euros
- Sandpaper grid 360, 2 euros – wax (12 euros a tin )
- Strand cotton 2 euros – Fabric between 12 and 30 euros/m
- Thin cardboard 2 euros depending on your needs
- Varnish, sheet metal for repairing, paint for fixing a specific area, black stain, anti-scratch pad, wood, nails, hinges, leather handles, etc.
➡️ Moreover, it would be ideal if you had the following tools :
- Screwdriver, hammer, pincers, pliers... for the spare parts.
- Orbital sander, detail sander, electric file and drill for basic works.
The "Guide de la restauration des malles" (Pdf file for Trunks restoration guide, in French)
It is not printed anymore.

Here is a sample of the book's pages :